
May 21, 2018 | Blog, News, Uncategorised
Setting up Facebook Business Manager
Do you use Facebook to market your business? It’s likely that you have a business page, ad account (even if you just boost posts) and a pixel. And if you waste time moving from page, to ad account and back to page again, then I highly recommend use Facebook Business Manager – an all in one dashboard to manage all your Facebook tools.
What is Facebook Business Manager?
Business Manager is a free platform created to help Facebook advertisers integrate marketing efforts across their business and with external partners, like agencies. Facebook Business Manager provides a solution for anyone who needs to run, place, track and manage assets such as Facebook page, Instagram account, audience list and product catalogues. Having all your business information all in one place helps you and your business maintain control of your Facebook assets and securely manage user access.
You must consider using Facebook Business Manager if:
- You have more than 1 person working on your Facebook and/or Instagram marketing
- You need to manage multiple Facebook or Instagram assets such as Facebook Pages, ad accounts, or app
- You use a supplier to help create, run, or manage your Pages or ads, but want your business to maintain ownership of all Pages, ad accounts, and assets like pixels
- You want control over access and permissions to your assets without attributing ownership to individuals who assist your business operations
- You want to request access to other pages, ad accounts, and apps, or share your pages, ads accounts, and apps with other agencies
Setting up
If you think Facebook Business Manager is for you, here are the basic steps in setting it up and getting started.
Note: You must decide first who is going to be the admin. Your admin will be in charge of all clients, employees and accounts.
- Go to Business.Facebook.com and log in using your personal account. Create your Business Manager Account and give it a name. Usually this would be your business name.
- Create your Profile. Give your first name, last name and business email id.
- Invite people to your Business Manager. When inviting people to your business manager, consider asking them to add log in approvals that will serve as an extra security feature.
To invite people to your business manager:
- Go to Business Manager Settings.
- Under the People and Assets tab, click People.
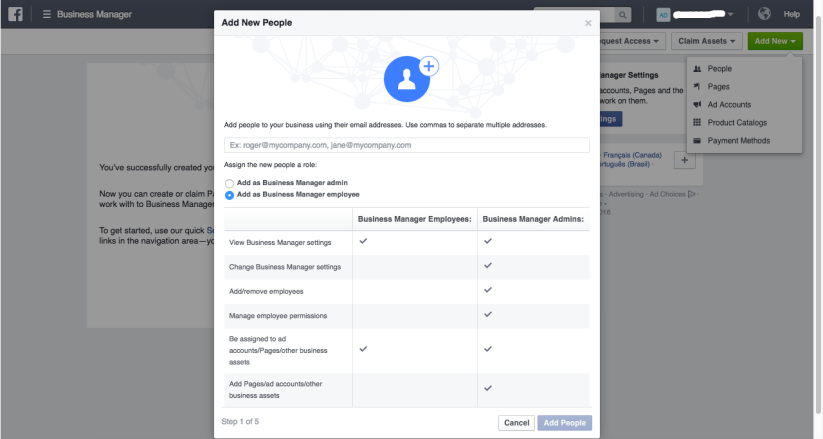
- Enter the work email addresses of the people you want to add and select the role you’d like to assign them
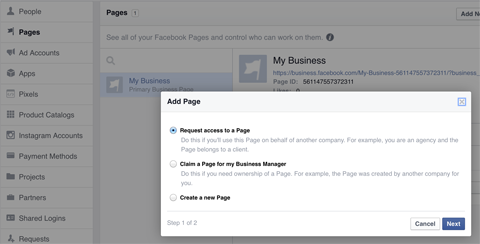
4. Add a page to Business Manager.
- Go to Business Settings
- Click the Pages tab.
- Click Add New Pages.
- Select one of the 3 options: Add a Page, Request Access to a Page or Create a New Page.
- If you choose to request access or add a Page, enter the Facebook page name or URL.
 5. Set up an employee to advertise on your page. You can add people to Business Manager to advertiser for your business without providing access to billing and invoice information.
Assign a role and an ad account to your employee:
- Go to Business Manager Settings.
- Under the People and Assets tab, click People.
- Search for the employee you want to make an advertiser and click Assign Assets.
- Select Pages, Ad Accounts, or Product Catalogs.
- Assign the Advertiser role.
- Click Save Changes.
Once you have set up the basics in Business Manager, you’re good to go. You can now separate work from your personal life.
If you want help getting more out of your social media marketing, please download our free step by step guide today!

Apr 12, 2017 | Blog, News, Uncategorised
Scheduling posts in Facebook – a How to Guide
With 15 million Facebook users in Australia, small businesses, just like yours, are seeing the opportunity to connect directly with current and potential customers.
Benefits of Facebook for your business
As long as your target market is on Facebook, using this platform can:
- Reduce your overall marketing costs – While using Facebook is generally free, there are still costs, like your own time, that need to be factored into your budget
- Increase traffic to your website – Once you have built your Facebook community, you should be directing them to parts of your website that are relevant. And Google likes this type of traffic!
- Increase your brand awareness – If you need to build your brand, creating a community of social media advocates that you turn into brand champions, will help create more (positive) awareness.
- Help you talk directly to your customers – More and more customers are taking to social media before ringing you. Being on top of your social media can help turn a complaint into a happy customer! You can also use social media to get real time market intel.
- Allow you to provide value long after the purchase – Once a customer has made a purchase, consider how you can keep them loyal through nurturing a relationship with them through social media.
Scheduling content
Once you start using Facebook to market your business, it is important to make sure you are posting content regularly. It is better to post a few times a week (though once a day is ideal) than 5 times only on the first day of the month.
Let’s say you want to build engagement online, you want to be active by posting at different times during the week, so that your audience has a chance to engage with your content. It’s like saying “Hi, I’m a real account and I’m active”. Seeing you and some other stuff about you means a lot to your target audience.
This is where ‘ batch content’ can really help. Spending time once a week to write all your posts, then scheduling them in advance so that they appear when you want them to, is a tool you might want to look at.
With that, scheduling some posts can help a lot. Imagine, there is a way to maintain your activities without the need to be in front of your computer 24/7. The convenience is really there and it saves you time so that you can look after other parts of your business.
Want to get started with your scheduling today? Here’s how you can do it for your Facebook page:
Step 1:
Log in to your Facebook Account to proceed to the page you want your post to come. Note that it does not allow you to schedule on your personal account. You can only do scheduling for your business pages, groups or fan pages.
Step 2:
Write your post in the area where you update your status. By default, it has a grey text saying “What have you been up to?”. You can also insert and attached some images, photo or video link if you prefer.
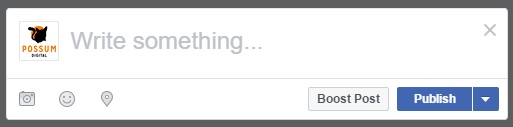
Step 3:
Click the arrow behind the POST button. Select “Schedule Post” and pick the date and time you want the post to get published.

And it’s that easy! So now there’s no reason you can’t post regularly on your Facebook page – you just need to start writing your content.
What if you made a mistake?
Oops. What if you forgot something and want to make some edits? Don’t worry, you can manage your posts to have it rescheduled, edited or deleted.
To do that, here’s how:
- Click for Publishing Tool located on top of your Page
- Pick the Scheduled Posts tab and the specific post you want to edit
- Click edit if you want to do some changes and click the dropdown menu to choose to Publish, Reschedule or Delete.
Hope this will help small business owners reach their business goals! Go and schedule your posts and make the most of this feature!
If you want help getting more out of your social media marketing, please download our free step by step guide today!